Understanding SharePoint storage
How does SharePoint storage work? How do you tell if it’s full, and can you increase your allowance? Let's unpack the answers.
by Drew Aspland, 30th January 2024
Understanding SharePoint storage
Jump to: freeing up space, buying more storage.
SharePoint is a web-based platform that allows you to create, share, and manage content, documents, and information. If you’re responsible for your business data, chances are you manage SharePoint sites. But what happens when SharePoint gets full? Let’s look at the fundamentals of SharePoint storage, and a few ways of managing your SharePoint storage allowance.
How much SharePoint storage do you get with Office 365?
Let’s cut to the chase; that’s why you’re here. To work out how much storage you get with Microsoft 365, use the following equation:
(number of 365 licenses x 10 GB) + 1 TB = total SharePoint storage allowance
Microsoft gives every tenant (i.e. your business) 1 TB of SharePoint storage as standard. On top of that, each 365 user license (such as 365 Business Basic, Standard or Premium) adds an additional 10 GB to the tenant’s SharePoint storage allowance.
Here’s an example: say you have 16 office-based users with 365 Business Standard, 10 remote users with 365 Business Basic, and 10 mailboxes using Exchange Online (plan 2), then your total SharePoint storage allowance would be 1,360 GB, or 1.36 TB.
There is no limit to how much extra storage you can buy for your tenant, but each SharePoint site can be up to 25 TB in size, and no more.
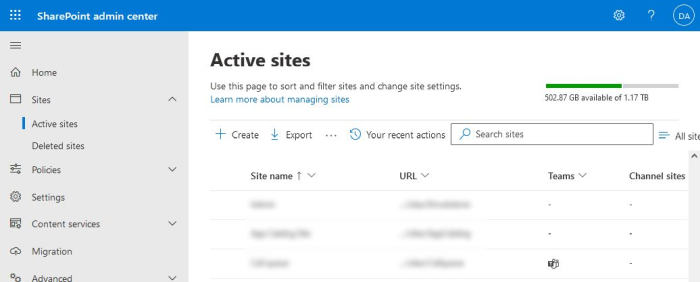
To see how much space your tenant has, and importantly, how much is available, head to your SharePoint Admin Centre. Select ‘Active sites’ in the left-side panel to view all of your SharePoint sites. In the top-right of this page, you will see your SharePoint allowance. Here’s ours in the image below. We have 502.87 GB available!
Technical note: in SharePoint, like other cloud storage services, 1 TB (terabyte) is defined in the metric 1,000GB (gigabytes), not the binary 1,024 GB. If you don’t know what I’m talking about here, then please don’t worry about it! But if you’ve worked with memory and storage systems at a hardware level, you may be aware of the difference.
Other storage limits
There’re some other limitations to storage in SharePoint that you should be aware of:
- File sizes in SharePoint are limited to 250 GB per file.
- Each SharePoint library can hold no more than 30 million files and folders (items).
- Each tenant can have no more than 2 million SharePoint sites.
Does SharePoint storage include OneDrive?
Individual users’ OneDrive areas do not count towards your SharePoint storage allowance. This is good news! Each user, as an individual, gets 1 TB of OneDrive storage space by default (this was increased from 500GB a few years ago).
It’s possible for a 365 admin to increase this to 5 TB per user (depending on the user’s 365 license type), again without affecting your SharePoint storage. And here’s a little hint: if a user requires more than 5 TB of OneDrive space (rare, but not beyond the realms of possibility) then Microsoft itself can increase it up to 25 TB per user if you contact 365 Support and pester them.
Freeing up space
How do you see what’s taking up all the space in SharePoint? Before you go about buying more, you might want to have a clear-out. Here’s how.
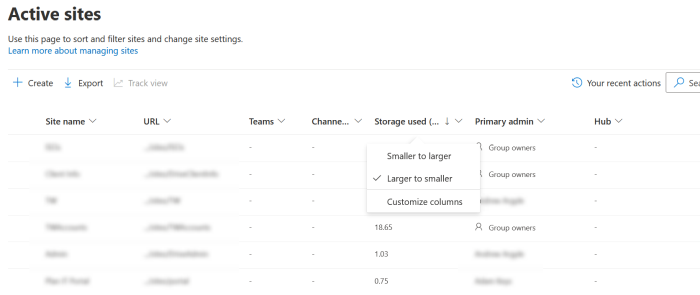
First we need to see which SharePoint sites are hogging your storage. Head to your SharePoint Admin Centre, and then Active Sites. You’ll be presented with a table of your sites; find the column called Storage Used and select the Larger to smaller option. This will sort your sites with the biggest offenders on top.
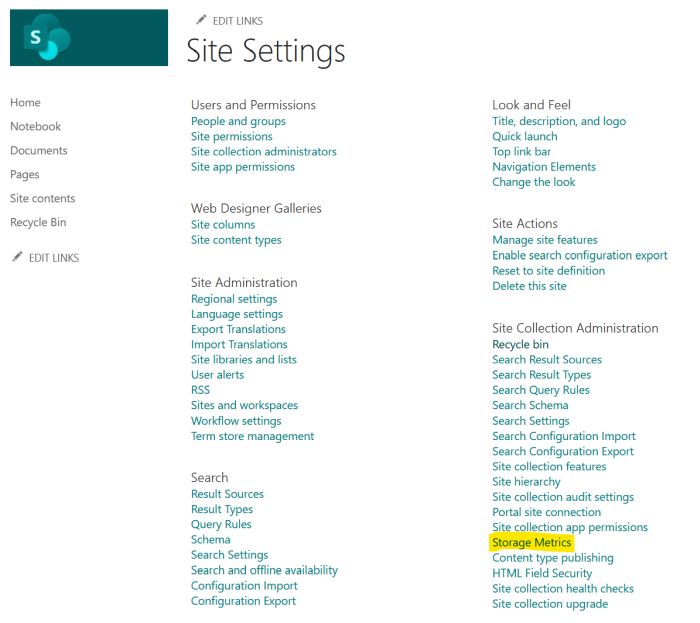
Head into one of the bigger sites by clicking the URL. Once inside, head to the Documents tab on the left, then the Settings cog in the top-right. From here, we select Site Contents, and then Site Settings. It’s a little convoluted, but you’ll now see a big list of settings. Find Storage Metrics, and click it.
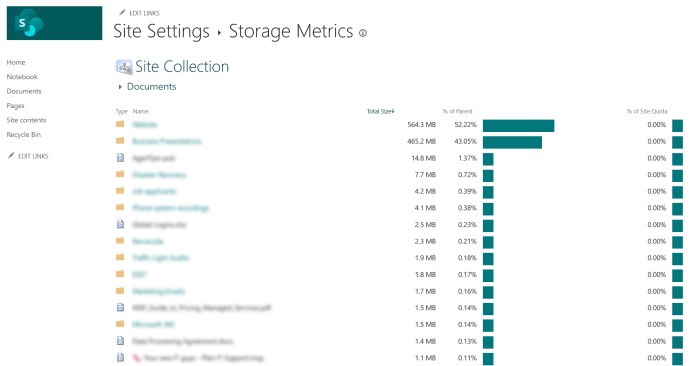
What you’re looking at now is a presentation of the data in your chosen SharePoint site, including the total size of files and folders in there. There is also, helpfully, a percentage bar-graph for each item, relative to the size of the library. This is a really useful, graphical way of seeing which files and folders are eating up all of your storage, and it will make spring-cleaning a doddle. Head into the biggest folders and see if you can delete anything.
The SharePoint Recycle Bin
What this doesn’t include, however, is the Recycle Bin. And guess what? The Recycle Bin counts towards your SharePoint storage allowance.
There’s a first-stage and a second-stage Recycle Bin for each SharePoint site, which is great as a safety net for files you may need to scoop out of purgatory, but not so great for storage management. Much as emptying the Recycle Bin on your PC is an easy-win for freeing up disk space, the same is true in SharePoint, so let’s take a look there too.
You’ll see the Recycle Bin in the left-side panel of the site. Click into it, and if there’s anything in there that you think you can safely, permanently delete, then delete it. This will send it to the second-stage Recycle Bin, which can be found by scrolling all the way down to the bottom of the first-stage one. Head into there, and delete it again. Now it’s gone forever (so be warned).
Emptying the Recycle Bin can often take up to 24-hours to reflect in the Storage Used column of your SharePoint sites, so prepare for that.
A clear-out of your bigger SharePoint sites, and taking out the rubbish, can free up an awful lot of space. But what if that’s not enough? Let’s look at increasing your SharePoint storage allowance.
How do you increase your SharePoint storage?
If you reach the limit of your SharePoint storage allowance, all of your SharePoint sites and libraries will go into read-only mode. Disaster! So how do you increase it?
Microsoft allows you to buy extra SharePoint storage space outright, without having to increase the number of Microsoft 365 licenses you own. If you let a managed service provider like Plan IT Support handle your subscriptions, then it’s likely you will have an MCA billing account type, and the below steps will look a little different to you. However, if you manage your tenant yourself (and have a MOSA billing account type, i.e. you signed up to Microsoft 365 directly with a credit card), then here’s how to add extra storage to SharePoint.
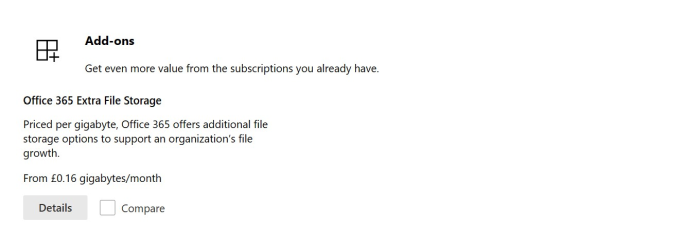
Extra SharePoint storage costs £0.16 per GB per month, or £1.92 per GB per year (exc. VAT). The frequency of payment (annual or monthly) will depend on which existing subscription you attach the add-on to, more of which later.
To add this to your tenant, head to the Admin Centre and then Billing > Marketplace. In the Add-Ons section at the bottom of this page, find Office 365 Extra File Storage, and hit the Details button.
On the next step, you’ll select which subscription you want to align your payments with (you might have 365 Business Basic or Business Standard, for example. You can see these in the Select one of your subscriptions dropdown menu.). If your chosen subscription is paid monthly, you will also pay for SharePoint Storage monthly. If annual, then annual. Once you’re happy, click on Connect to subscription to complete the purchase. You can specify how much extra storage (in gigabytes) you’d like to buy here, or you can leave it set to the default 1 GB and increase / decrease later.

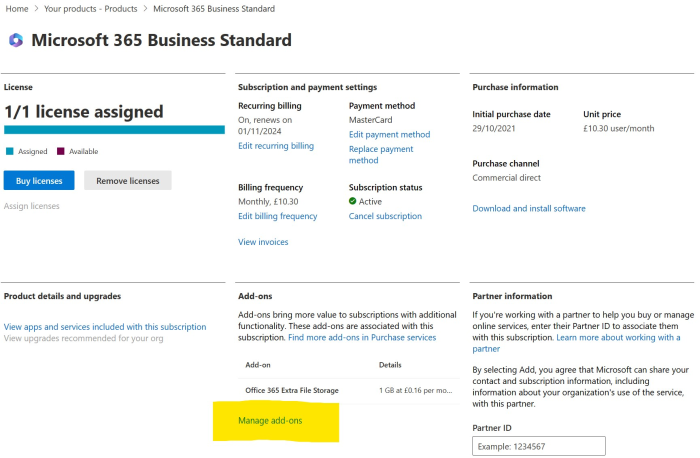
Once you have purchased the add-on, you can increase and decrease the amount of extra file storage on the fly. Back in the Admin Centre, choose Billing and then Your Products. Find the product that you aligned the add-on with. In my case, I have aligned it with my subscription to Microsoft 365 Business Standard.
The details page of your product subscription should look like the image below. Manage add-ons is highlighted in yellow. Click it.
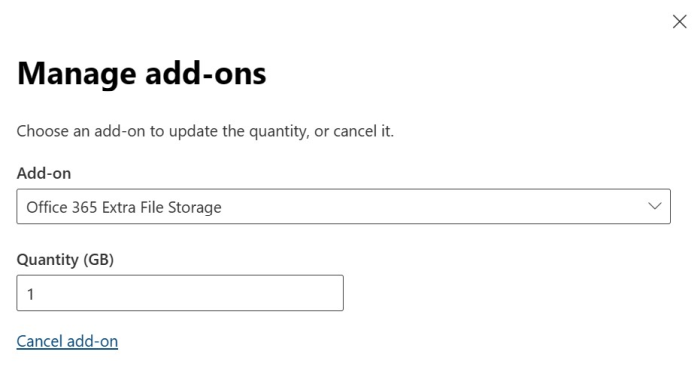
Here you’re presented with a fly-in that allows you to quickly and simply increase or decrease the amount of storage you wish to pay for. Even if you pay monthly or annually, changing this will apply immediately, and Microsoft will bill you pro-rata.
You’re now a master at managing your SharePoint storage allowance. A clean-up like that described above should be a regular part of your data management. And getting rid of things you don’t need feels good, right? But if push comes to shove, you know you’re able to increase your allowance. You need never worry about your SharePoint sites going into read-only mode again.
SharePoint sucking the soul from your body? Let Plan IT Support handle it for you.